How to Set Up 'Arrange VI Window' for an Orderly Project
Nowadays at work I get to use LabVIEW 2020, which has some great inbuilt shortcuts. One of these is 'Arrange VI Window'.
Arrange VI Window was added into LabVIEW 2019, but can be downloaded for earlier LabVIEW versions here. The default QuickDrop shortcut is Ctrl + Space, Ctrl + F. It does many things apart from arranging the windows - moving the origin to (0,0), aligning controls on the front panel to match the connector pane ('clean up front panel'), and resizing the windows to fit the code or as much code as possible with a small border. These are all great. But I was after something in particular that it didn't seem to provide.
I had been working on a module with some repetitive code - think lots of similar subVIs with different inputs and outputs. The repetitive VI had a VI Template to keep things neat, but I found sometimes I accidentally moved one of the windows and it really annoyed me that they didn't all line up any more. Moving a window a few pixels at a time is not fun.
Arrange VI Window sounded like a perfect solution, but it didn't do what I wanted out of the box. I had imagined that it would position the VI Front Panel and Block Diagram side by side, not in an ugly tiled 'Ctrl + T' way with it split down the middle, but with the windows resized to their minimum size with a border around them. However, instead I found that the windows overlapped. I have big monitors which usually provides adequate space for both Front Panel and Block Diagram to be fully shown, so I wanted to avoid overlap if possible.
 |
| We learn the Ctrl+T shortcut then we erase it from our brains. So much whitespace! |
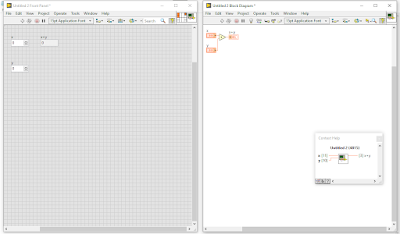
 |
| Default settings for Arrange VI Window: not what I wanted |
Luckily, the developer had allowed much of the shortcut behaviour to be customised with ini keys for the labview.ini file. Thank you Kosta! These ini keys are documented in a table here.

The values I ended up adding to my ini file were:
- ArrangeVIWin.BD.LeftGap = 700
- ArrangeVIWin.FP.LeftGap = 0
- ArrangeVIWin.FP.TopGap = 0
- ArrangeVIWin.BD.TopGap = 0
 |
| Arrange VI Window with some ini keys applied |
- ArrangeVIWin.FP.MinWindowWidth = 715
- ArrangeVIWin.FP.MinWindowHeight = 300
- ArrangeVIWin.BDCanvasMargin = 30
 |
| Arrange VI Window with these extra ini keys |
Hope this helps you keep your projects neat. Let me know in the comments if you have any more tips.
I ended up doing a talk on QuickDrop which covered this topic: you can find it at https://www.youtube.com/watch?v=TbfEZv_zTSw&t=1775s
ReplyDelete